Honda CR-V Cabin Air Filter Guide (Replace, Cost, etc)
Breathe easier every time you hit the road in your Honda CR-V!
When it comes to car maintenance, it’s easy to focus on the big stuff like engine fluids, coolant, or brake pads. But there’s one part that often gets overlooked: the cabin air filter. And believe it or not, it’s a key part of making your drive more comfortable for you and your family.
The cabin air filter helps keep the air inside your vehicle clean and fresh. If you ignore it, you might start noticing stale air or even unpleasant odors creeping into your CR-V’s cabin.
I made that mistake myself. I didn’t check the cabin air filter for over two years, and eventually, my car started to feel stuffy and just plain uncomfortable.
So in this article, I’m sharing what I’ve learned about the cabin air filter. I’ll walk you through how to check and clean it, when it’s time to replace it, and a few helpful tips to keep the air inside your CR-V feeling fresh and clean.
What is Cabin Filter?
In short, a cabin air filter is a part of the HVAC system that cleans the outside air before it enters the cabin, assuming the doors and windows are closed. Its job is to make sure the air inside stays fresh and clean.
Cabin air filters are usually located under the dashboard. They help trap dust, smoke, odors, allergens, and other contaminants as outside air passes through on its way into the interior.
Why is a Clean Cabin Filter Important?
As mentioned earlier, the cabin air filter plays an important role in keeping the air inside your vehicle clean and healthy. That’s why it’s essential to keep the filter itself clean and well-maintained.
Here’s a closer look at why a clean cabin air filter matters for your CR-V.
Filtering Out Dust, Pollen, and Other Airborne Particles
Just like the air outside, the air that flows into your car’s ventilation system can carry all sorts of particles like dust, smoke, industrial pollution, and even pollen during allergy season.
A clean cabin air filter does its job by effectively trapping these particles before they reach the cabin. But when the filter gets dirty or clogged, it becomes less effective, allowing dust and unhealthy air to enter the cabin.
Improving Airflow and Efficiency of Heating and Cooling
When the cabin air filter is dirty, airflow to the ventilation system becomes restricted. This can lead to reduced performance from the air conditioner in your CR-V. You might notice that it takes longer for the cabin to cool down, and the air coming from the vents feels weaker than usual.
I’ve experienced this myself. At one point, the air conditioner wasn’t cooling the cabin properly and took much longer to do its job. After replacing the cabin air filter with a new one, the AC started working normally again.
Minimizing Unpleasant Odors
In addition to trapping particles, the clean cabin air filter also helps reduce and block unpleasant odors from entering the cabin. This includes smells from other vehicles, industrial waste, and more.
When to Replace Your CR-V Cabin FilteR
To keep the cabin air filter working properly, it’s important to replace it when it becomes too dirty to filter particles effectively.
According to the Honda CR-V maintenance schedule in the owner’s manual, Honda recommends replacing the cabin air filter every 15,000 miles or once a year—especially if you live in an area with heavy industrial pollution.
Aside from following the manufacturer’s recommendations, it’s also a good idea to watch for signs that your cabin air filter may need replacing, even if you haven’t yet reached the suggested mileage or time interval.
Here are some common signs that your cabin air filter might be due for a change:
- The AC takes longer than usual to cool the cabin
- Reduced airflow from the vents
- Musty or unpleasant odors inside the car
- Increased allergy symptoms while driving
DIY Cabin Air Filter Replacement
Replacing the cabin air filter is actually pretty simple, and you can definitely do it yourself at home.
Before we get started, it’s important to know where the cabin air filter is located. In the Honda CR-V, the cabin air filter sits behind the glove compartment on the passenger side. Just open the compartment, and you’ll see the access panel where the filter is installed.
Here’s a step-by-step guide to help you replace the cabin air filter:
- Open the Glove Box
Start by emptying the glove box so nothing gets in the way. - Lower the Glove Box
Gently squeeze both sides of the glove box inward, then pull it down to lower it. - Release the Damper Arm
On the right side, you’ll see a small arm (the damper). Push it down to unhook it from the glove box. - Open the Filter Cover
Locate the cabin air filter housing behind the glove box. Squeeze the tabs on both sides of the cover and pull it out. - Remove the Old Filter
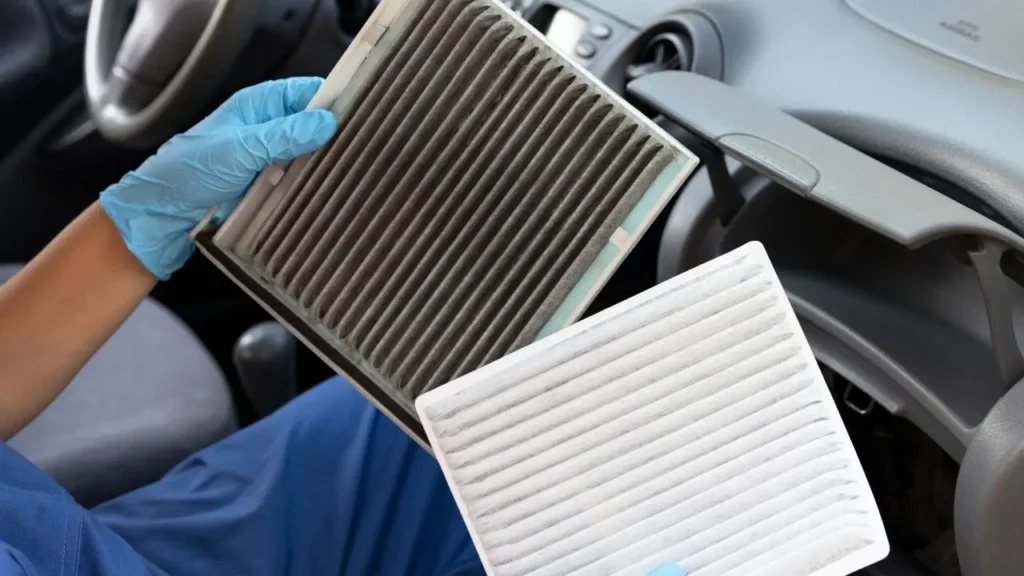
Slide out the dirty filter. Take note of the airflow direction printed on the side of the filter. - Insert the New Filter
Place the new filter into the housing, making sure the airflow direction matches the markings. - Close the Filter Cover
Slide the cover back into place and press until it clicks securely. - Reattach the Damper Arm
Extend the arm and hook it back onto the glove box. - Close the Glove Box
Push the glove box back up until it snaps into position..
If the written instructions aren’t clear enough, you can check out the video from JJ Central below. In the video, JJ Central walks you through the cabin air filter replacement process for the Honda CR-V in clear, step-by-step detail.
Choosing the Right Cabin Filter
There are a few different types of cabin air filters, each designed with varying levels of protection. Some filters are even coated with special materials that can help capture and neutralize bacteria and viruses.
In general, cabin air filters fall into three main categories: basic filters, activated carbon filters, and anti-microbial filters.
Basic Cabin Air Filter
This is the most common type and is usually what comes pre-installed from the factory. Its primary function is to trap dust, pollen, and other airborne particles.
Activated Carbon Filter
Like the basic filter, this one also captures dust and pollen. However, it includes an activated carbon layer that helps absorb and eliminate odors before they reach the cabin.
Anti-Microbial Filter
This is the most advanced type. In addition to filtering particles and reducing odors, it also features an antimicrobial layer that helps block bacteria and other harmful microorganisms from entering the cabin.
So, which cabin air filter should you choose? It really depends on your needs and budget. If you’re just looking for basic filtration, the standard filter will do the job and is usually the most affordable. But if you often drive in areas with poor air quality, investing in an anti-microbial or carbon filter could be a smart move for a healthier ride.
(molekule)
Cabin Filter Replacement Cost
Now that you know how to change the cabin air filter and which type might be best for you, you’re probably wondering—how much does it actually cost to replace one?
According to RepairPal.com, the cost to replace the cabin air filter on a Honda CR-V typically ranges between $65 and $85.
Labor makes up most of that cost, estimated between $39 and $58, while the part itself is usually priced between $26 and $27. A bit pricey, right? That’s why doing the replacement yourself at home can lead to significant savings.
If you purchase the filter online from Amazon or AutoZone, cabin air filter prices can range from as low as $10 for a basic filter to around $70 for a high-end filter with antibacterial properties.
By buying the filter yourself and handling the installation at home, you can either save money or upgrade to a better filter for the same price you’d pay a mechanic or dealership.
Frequently Asked Questions
Keep the cabin air healthy and fresh
The cabin air filter may be small and inexpensive, but it plays a crucial role in maintaining comfort inside your car. Since you’ll be spending a lot of time in your CR-V while driving, keeping the cabin air filter clean will ensure a more comfortable ride.
Replacing the cabin air filter is easy and affordable—you can do it yourself at home without much hassle.
Personally, I’m using a standard cabin air filter right now, but I’m planning to upgrade to a carbon-activated filter soon for better air filtration.
Do you have any experiences with your CR-V’s cabin air filter? I’d love to hear about it—drop a comment below!
One Comment